TKO
technically knocking out some Tcl/Tk codeInitialize!
I had solved the riddle of the dice roll, which was neat, but I have a whole bag of dice, so although it was nice, those first few programs were more for learning’s sake than anything. It was time to build something actually useful.
In a roleplaying session, you’ll typically end up in an encounter or two, where the players run into some bad guys and a battle ensues. Combat is turn-based though, so you must first decide the order of the turns. In 4e, every creature (including the players) have an initiative bonus which gets added to a d20 roll. A higher value means you get to go sooner.
Thinking design-wise, I figured I would need the following:
- Input for a creature’s name
- Input for a creature’s initiative bonus
- A call to a diceroll function that would add the bonus
- A list of all of the values
- Functions to sort and delete an individual score
Gooey for the GUI
It didn’t take me long to decide that rather than just have to deal with a command prompt for the Initiative Tracker, I’d rather have a nice, windowed, visual representation of what was going on. Because I use py3k, things like pywin aren’t available, so I had to use the tkinter module.
I had never used tkinter before, nor any version of any kind of Tcl programming. So I hit up the google, and I found all kinds of nice-looking documentation with plenty of examples (which, in my mid, if you are going to do docs right, you best load them up with examples!).
Getting a tk window to appear is actually prety easy. Import the module then throw in one line of code: main_window = tkinter.Tk()
I like easy like that.
In fact, setting up the tk window was in general pretty easy, once I found all the parts I needed and the proper syntax. I decided to use the grid setup, rather than the pack setup, because grids are easy and you don’t have to plot pixels and do crazy stuff like that. After getting my rows and columns all counted and correct, I had the following layout:
main_window = tkinter.Tk()
main_window.title("Initiative Tracker")
frame = tkinter.Frame(main_window, relief=RIDGE, borderwidth=2)
frame.pack(fill=BOTH, expand=1)

toplabel = tkinter.Label(frame, text="Initiative Tracker")
toplabel.grid(column=0, row=0, columnspan=4, pady=5)

l =[]
listbox = tkinter.Listbox(frame, selectmode=BROWSE, height=6)
for item in l:
    listbox.insert(END, item)
listbox.grid(column=0, row=1, rowspan=3)

yscroll = tkinter.Scrollbar(frame, command=listbox.yview, orient=VERTICAL)
yscroll.grid(column=1, row=1, rowspan=3, sticky=(N,S,W))
listbox.configure(yscrollcommand=yscroll.set)

addentry = tkinter.Entry(frame, width=20)
addentry.insert(0, '')
addentry.grid(column=2, row=1, columnspan=2, padx=5, pady=5)

addbutton = tkinter.Button(frame, text="add", command=add_item)
addbutton.grid(column=2, row=2)

rollbutton = tkinter.Button(frame, text='roll for selected', command=roll_it)
rollbutton.grid(column=3, row=2)

sortbutton = tkinter.Button(frame, text='sort', command=sort_list)
sortbutton.grid(column=2, row=3)

delbutton = tkinter.Button(frame, text="delete selected", command=delete_item)
delbutton.grid(column=3, row=3)

botlabel = tkinter.Label(frame, text="© Nathaniel Ray Pickett")
botlabel.grid(column=0, row=4, columnspan=2, padx=5, sticky=W)

quitbutton = tkinter.Button(frame, text="Exit", command=main_window.destroy)
quitbutton.grid(column=2, row=4, columnspan=2, pady=5)

main_window.mainloop()
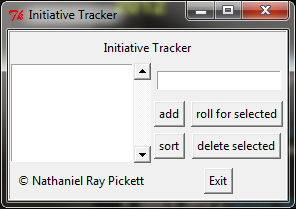
That ends up looking like this when you run the program:
Function Junction
Design? Check. But without any code to run, all the buttons are boring and dumb. I’ve got 5 buttons, so I needed 5 functions: delete, add, sort, roll, and exit (except exit doesn’t count because the tk code can do it built-in).
Three of them were pretty easy, getting data from inputs or lists, then sending that info to the right places:
def delete_item():
    try:
        index = listbox.curselection()[0]
        listbox.delete(index)
    except IndexError:
        pass

def add_item():
    listbox.insert(END, addentry.get())
    addentry.delete(0, END)

def sort_list():
    temp_list = list(listbox.get(0, END))
    temp_list.sort(key=lambda thing: thing[0])
    listbox.delete(0, END)
    for item in temp_list:
        listbox.insert(END, item)
I thought roll would also be pretty easy, but then I remembered I still needed to add an initiative bonus, so I had to do some more googling to find out how to make a popup window asking for the bonus. The answer: I had to write the thing that I hate writing the most because I don’t understand how it works very well–a Class.
This is the code for roll and its attendant class, which has to go first because it has to exist before it can be called:
class AskBox:
    def __init__(self, parent):
        top = self.top = tkinter.Toplevel(parent)
        top.title('Add bonus')

        self.l = tkinter.Label(top, text='Add initiative bonus')
        self.l.grid(column=0, row=0, columnspan=2)

        self.e = tkinter.Entry(top, width=10)
        self.e.insert(0, '0')
        self.e.grid(column=0, row=1, padx=3, pady=5)

        b = tkinter.Button(top, text="ok", command=self.ok)
        b.grid(column=1, row=1, padx=3, pady=5)

    def ok(self):
        self.result = self.e.get()
        self.top.destroy()

def roll_it():
    try:
        index = listbox.curselection()[0]
        sel = listbox.get(index)

        main_window.update()
        ask = AskBox(main_window)
        main_window.wait_window(ask.top)

        rand = random.randint(1,20) + int(ask.result)
        this = str(rand).rjust(2, '0'), sel
        listbox.delete(index)
    except IndexError:
        index = END
    listbox.insert(index, this)
Basically, you type a name in, click ‘add’, it goes to the box. You click on its name there, click ‘roll’, type in the Initiative Bonus, click ‘ok,’ and then the value in the list is updated reflecting the value of the roll.
Kind of clunky, but hey, it worked.
Pretty sweet, right? For a first time, yes. But next time I reveal 1) how I made it more awesome by looking more awesome and 2) how I made it more awesome* by being a windows executable.
- used liberally here
Give it a Spin
You can grab/fork this script from its github page, and if you have any suggestions/comments (and you don’t want to fork it), tweet me up @thunderchao